SpringBoot 配置文件相关
注册为 Bean 的注解
一般使用 @Autowired 注解自动装配 bean,要想把类标识成可用于 @Autowired 注解自动装配的 bean 的类,采用以下注解可实现:
@Component:通用的注解,可标注任意类为 Spring 组件。如果一个 Bean不知道属于哪个层,可以使用@Component注解标注。@Repository: 对应持久层即 Dao 层,主要用于数据库相关操作。@Service: 对应服务层,主要涉及一些复杂的逻辑,需要用到 Dao层。@Controller: 对应 Spring MVC 控制层,主要用于接受用户请求并调用 Service 层返回数据给前端页面。
yml 配置文件的编写
注意:yaml 与 properties 配置文件除了展示方式不同,其他的功能都是一样的(读取方式无需改变)
语法特征:
- 树状层次结构展示配置项
- 配置项之间如果有关系的话需要分行空两格
- 配置项如果有值的话,那么需要在
:之后空一格再写配置项值
jdbc:
    driver: com.mysql.cj.jdbc.Driver
    url: jdbc:mysql://localhost:3306/springboot_test?useUnicode=true&characterEncoding=utf8&useSSL=true&useServerPrepStmts=true
    username: root
    password: 123
以 - 开头的行表示构成一个数组:
- A
- B
- C
多个 yml 配置文件
多个 yml 配置文件时,这些配置文件的名称必须为 application-xxx.yml 并且这些配置文件必须要在 application.yml 配置文件中激活之后才可以使用
例如定义了 application-abc.yml 和 application-def.yml 两个文件,则在 application.yml 中激活(加入如下字段)
spring:
    profiles:
        active: abc,def
# 激活配置文件只需指定 - 后面的名称就好了
properties 文件激活也差不多
# 激活 jdbc yml文件
spring.profiles.active=abc,def
如果 properties 和 yml 配置文件同时存在 Spring Boot 项目中,那么这两类配置文件都有效(同名的话会以 properties 文件为主)
配置多套环境
在 Spring Boot 中多环境配置文件名需要满足 application-{profile}.properties 的格式,其中 {profile} 对应你的环境标识(不一定是 .properties 文件,也可以是 .yml 文件).profile 的值,是开发者自定义的,只需要在启动的时候,添加对应的参数,SpringBoot 就会去读取该配置文件了。比如我们可以定义为如下格式:
application-dev.properties:开发环境
application-test.properties:测试环境
application-prod.properties:生产环境
如果启动的时候,没有指定配置文件,或者指定的配置文件没有对应的项,则会从默认的配置文件中读取。
我们可以通过 spring.profiles.active 参数来指定环境。
启动指定环境的方法
1、命令行启动指定
可以添加 -Dspring.profiles.active=<profile> 的方式指定
如,指定 happy 环境:
java -jar "-Dspring.profiles.active=happy" springboot-0.0.1-SNAPSHOT.jar

2、在 IDEA 中指定 在 run/debug configuration 中,可以配置环境,如下:

配置用到的注解
在 Spring 的时候就提到过配置 Bean 有两种方式,一个是通过 XML 文件,一个是注解,现在到了 SpringBoot 则是完全采用注解的形式进行配置
回顾一下配置用的注解
@Configuration:声明一个类作为配置类@Bean:声明在方法上,将方法的返回值加入 Bean 容器,代替<Bean>标签@Value:属性注入@PropertySource:指定外部属性文件(properties 文件)@ConfigurationProperties直接读取配置项
在配置类里面读取配置文件
如下,编写一个 JDBC 的配置类
注:一般不使用 @Value 注解,直接使用 @ConfigurationProperties 注解就能读取全部配置项(下面有演示),这里是为了演示
@Configuration
@PropertySource("classpath:jdbc.properties")
public class JdbcConfig {

    @Value("${jdbc.url}")
    String url;

    @Value("${jdbc.driver}")
    String driverClassName;

    @Value("${jdbc.username}")
    String username;

    @Value("${jdbc.password}")
    String password;

    @Bean
    public DataSource dataSource(){
        DruidDataSource druidDataSource = new DruidDataSource();
        druidDataSource.setDriverClassName(driverClassName);
        druidDataSource.setUrl(url);
        druidDataSource.setPassword(password);
        druidDataSource.setUsername(username);
        return druidDataSource;
    }
}
指定读取哪个文件
@PropertySource 读取指定 properties 文件
@Component
@PropertySource("classpath:website.properties")
@Getter
@Setter
class WebSite {
    @Value("${url}")
    private String url;
}
使用例:
@Autowired
private WebSite webSite;

System.out.println(webSite.getUrl());
直接读取数据与 Bean 绑定
LibraryProperties 类上加了 @Component 注解,我们可以像使用普通 Bean 一样将其注入到类中使用,这里直接使用 @ConfigurationProperties 注解就能读取全部配置项
@Component
@ConfigurationProperties(prefix = "library")
@Setter
@Getter
@ToString
class LibraryProperties {
    private String location;
    private List<Book> books;

    @Setter
    @Getter
    @ToString
    static class Book {
        String name;
        String description;
    }
}
这个时候你就可以像使用普通 bean 一样,将其注入到类中使用:
@SpringBootApplication
public class ReadConfigPropertiesApplication implements InitializingBean {

    private final LibraryProperties library;

    public ReadConfigPropertiesApplication(LibraryProperties library) {
        this.library = library;
    }

    public static void main(String[] args) {
        SpringApplication.run(ReadConfigPropertiesApplication.class, args);
    }

    @Override
    public void afterPropertiesSet() {
        System.out.println(library.getLocation());
        System.out.println(library.getBooks());    }
}
通过 @ConfigurationProperties 读取并校验
将 application.yml 修改为如下内容,明显看出这不是一个正确的 email 格式:
my-profile:
  name: temp
  email: temp@
ProfileProperties 类没有加 @Component 注解。在我们要使用 ProfileProperties 的地方使用 @EnableConfigurationProperties 注册我们的配置 Bean:
import lombok.Getter;
import lombok.Setter;
import lombok.ToString;
import org.springframework.boot.context.properties.ConfigurationProperties;
import org.springframework.stereotype.Component;
import org.springframework.validation.annotation.Validated; // 注意这个包

import javax.validation.constraints.Email;
import javax.validation.constraints.NotEmpty;


@Getter
@Setter
@ToString
@ConfigurationProperties("my-profile")
@Validated
public class ProfileProperties {
   @NotEmpty
   private String name;

   @Email // 使用了上面 validation 包内的工具
   @NotEmpty
   private String email;

   //配置文件中没有读取到的话就用默认值
   private Boolean handsome = Boolean.TRUE;

}
具体使用:
@SpringBootApplication
@EnableConfigurationProperties(ProfileProperties.class)
public class ReadConfigPropertiesApplication implements InitializingBean {
    private final ProfileProperties profileProperties;

    public ReadConfigPropertiesApplication(ProfileProperties profileProperties) {
        this.profileProperties = profileProperties;
    }

    public static void main(String[] args) {
        SpringApplication.run(ReadConfigPropertiesApplication.class, args);
    }

    @Override
    public void afterPropertiesSet() {
        System.out.println(profileProperties.toString());
    }
}
编写装载配置类演示:RSA 案例
先导入配置依赖:
为了方便书写配置文件,SpringBoot 会提示你添加一个依赖(配置文件处理器)
<dependency>
  <groupId>org.springframework.boot</groupId>
  <artifactId>spring-boot-configuration-processor</artifactId>
  <optional>true</optional>
</dependency>
这里使用 RSA 配置的那篇笔记的粒子
在 yml 文件添加如下自定义的配置
rsa:
  key:
    pubKeyPath: "classpath:rsa/id_key_rsa.pub"
    priKeyPath: "classpath:rsa/id_key_rsa"
创建一个自定义类
@Data
@ConfigurationProperties("rsa.key")     //指定配置文件的key
public class RsaKeyProperties {
    @Autowired
    private ResourceLoader resourceLoader;

    private String pubKeyPath;
    private String priKeyPath;

    private PublicKey publicKey;
    private PrivateKey privateKey;

    @PostConstruct
    public void createKey() throws Exception {
        // 先取得路径,因为使用的是 classpath 的形式,所以得使用 Spring 提供的路径工具
        String pp = resourceLoader.getResource(pubKeyPath).getFile().getAbsolutePath();
        String pk = resourceLoader.getResource(priKeyPath).getFile().getAbsolutePath();

        this.publicKey = RsaUtils.getPublicKey(pp);
        this.privateKey = RsaUtils.getPrivateKey(pk);
    }
}
然后再在启动类里面注册这个配置类
@SpringBootApplication
@EnableConfigurationProperties(RsaKeyProperties.class)                    // 将配置类放入 Spring 容器中
public class OAuthApplication {
    public static void main(String[] args) {
        SpringApplication.run(OAuthApplication.class, args);
    }
}
这时就已经可以读取到参数了,但是可以发现 IDEA 这里还是有警告,而且如何设置这个自定义参数的说明呢?
只需要加上 @NestedConfigurationProperty 注解即可
@NestedConfigurationProperty
private String pubKeyPath;
@NestedConfigurationProperty
private String priKeyPath;
在对应配置文件 ait+回车 自动生成下面这个文件,填上注释就行了
{
  "properties": [
    {
      "name": "rsa.key.priKeyPath",
      "type": "java.lang.String",
      "description": "自定义的私钥位置."
    },
    {
      "name": "rsa.key.pubKeyPath",
      "type": "java.lang.String",
      "description": "自定义的公钥位置."
    }
  ]
}
然后输入命令
mvn clean package
注意,如果显示依赖问题(微服务情况下)则把各个子模块都 install 一下(就是将它们添加到本地依赖中)

然后就能显示说明了

Docker 动态传参
假设现在有一个 Springboot 项目,它里面有一个数据库的配置项,但是不同的数据库测试环境 (DEV\SIT\UAT),数据库 ip有多个,想使用同一个 Springboot 项目镜像,可以随时切换数据库配置,简单来说就是你的 Springboot 应用的数据库配置应该是通过外部传入,而不是 hardcode
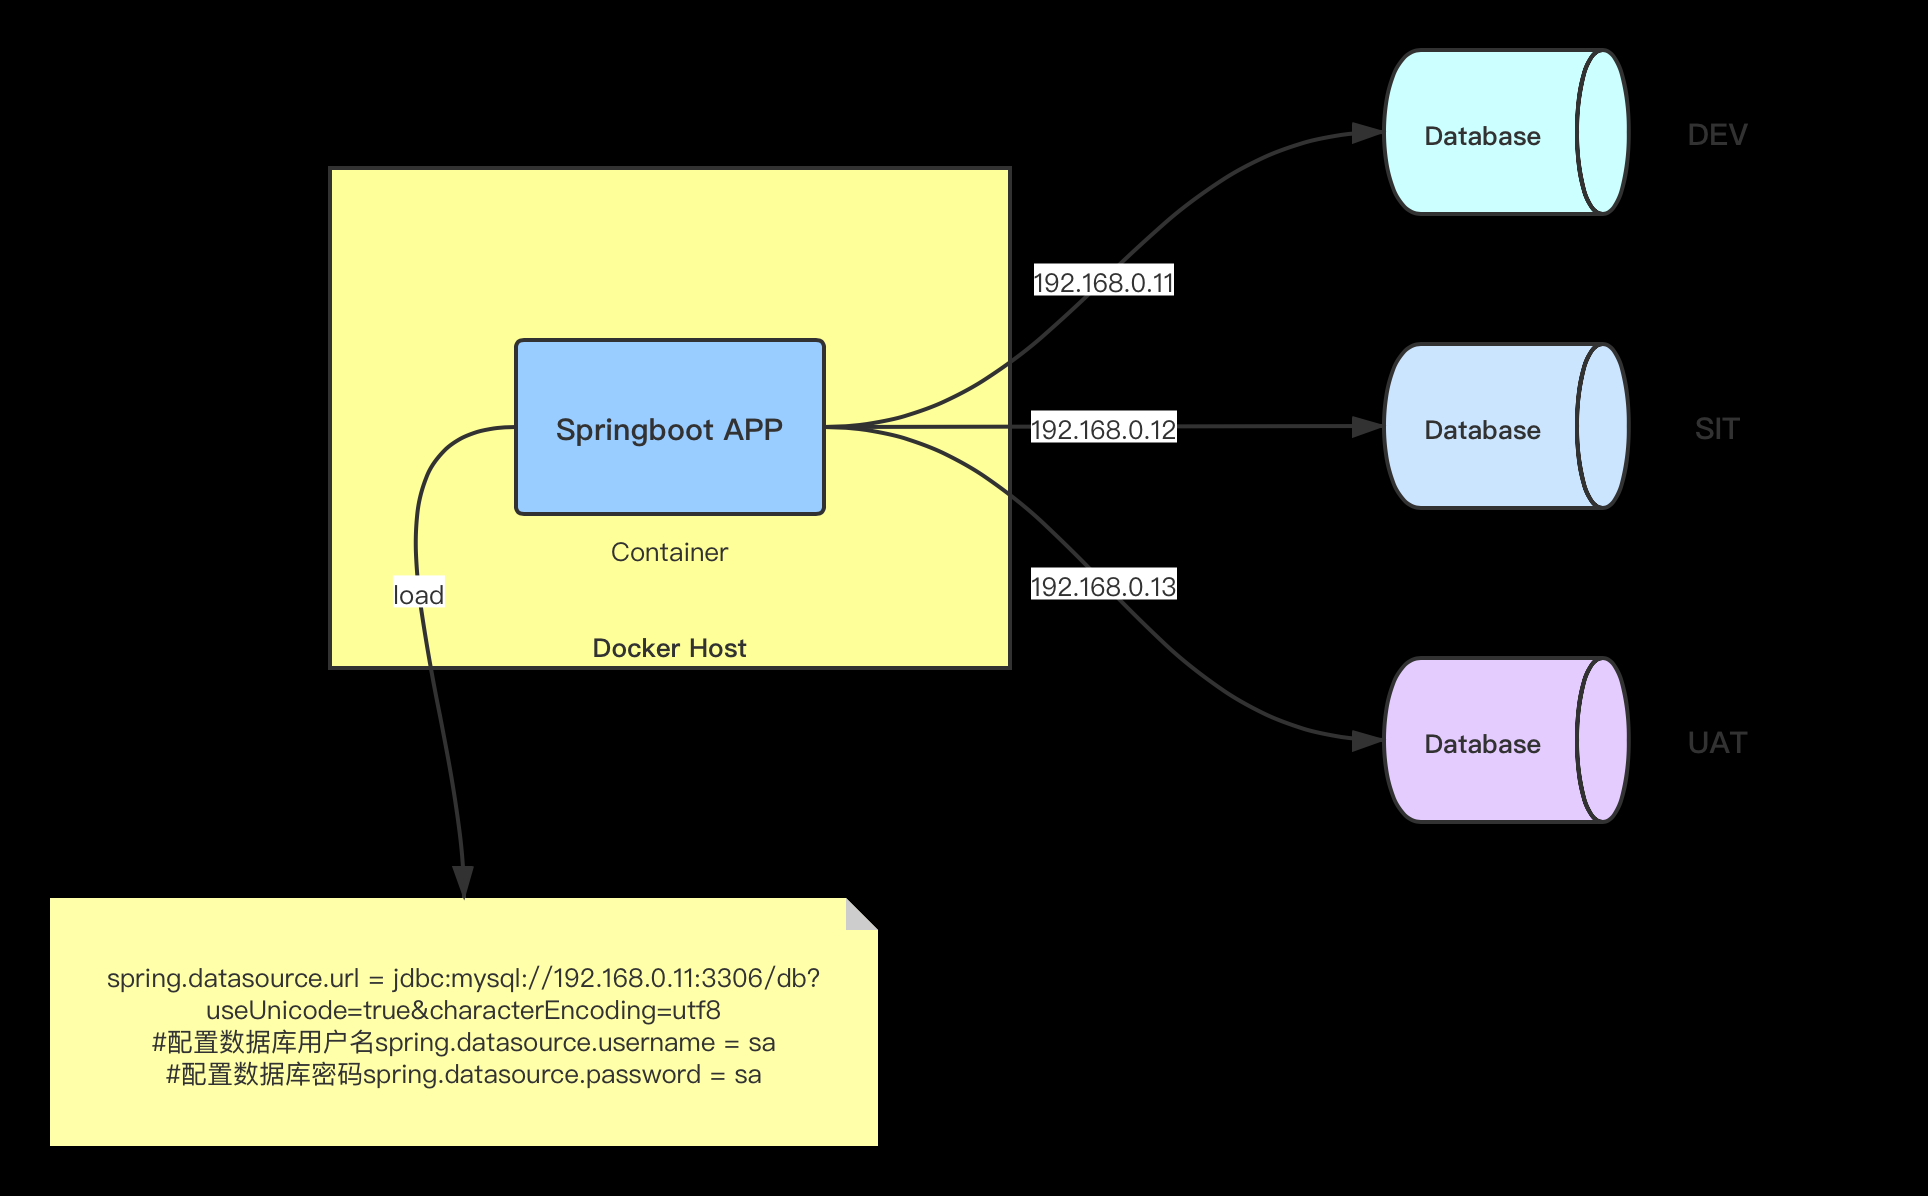
Springboot 应用里有个数据库配置如下:
spring.datasource.url = jdbc:mysql://192.168.0.11:3306/db?useUnicode=true&characterEncoding=utf8
#配置数据库用户名
spring.datasource.username = sa
#配置数据库密码
spring.datasource.password = sa
解决方案
利用 SpEL 表达式,动态从环境变量获取数据库配置
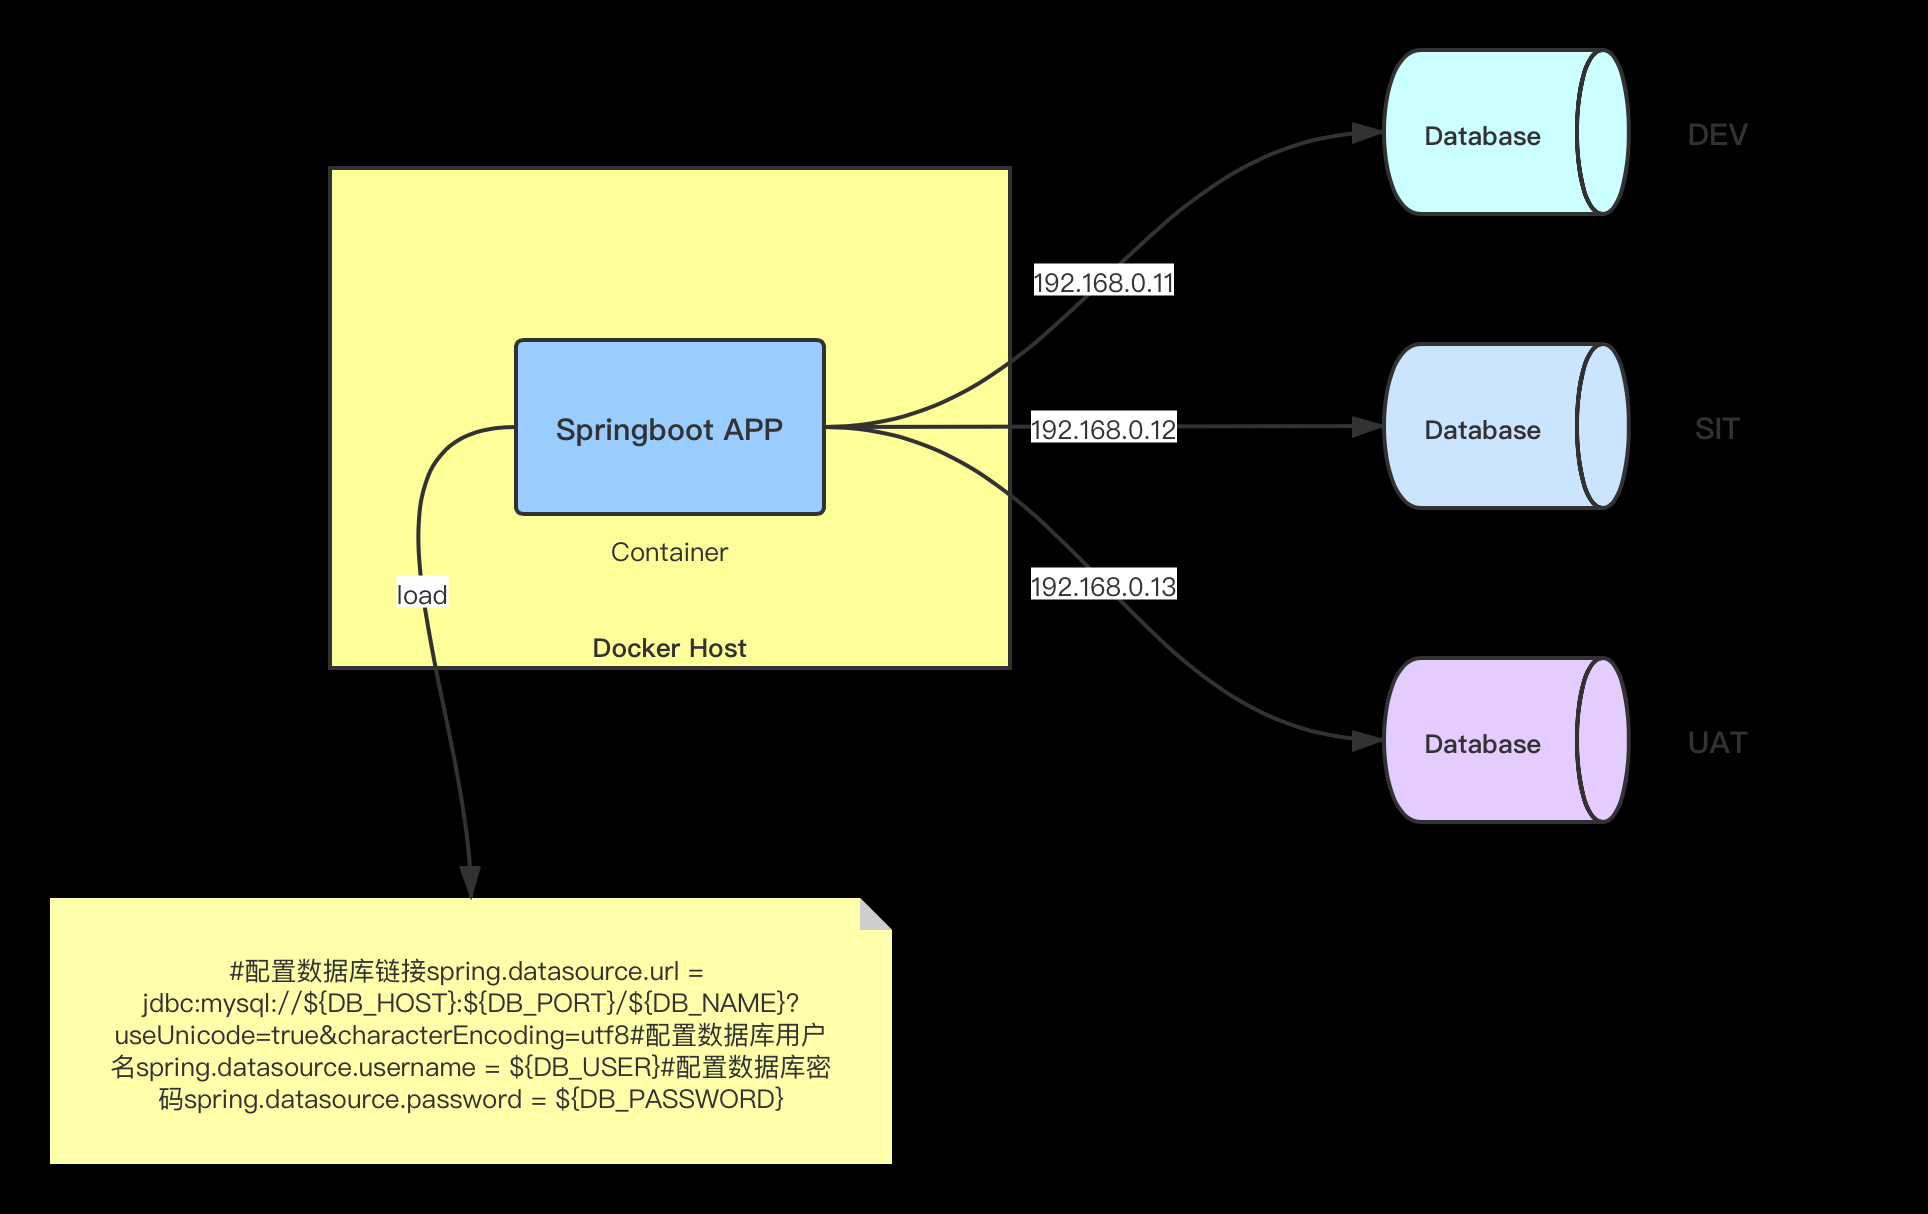
接下来我们在 Springboot 配置文件把数据库配置用 spEL 表达式替换
#配置数据库链接
spring.datasource.url = jdbc:mysql://${DB_HOST}:${DB_PORT}/${DB_NAME}?useUnicode=true&characterEncoding=utf8
#配置数据库用户名
spring.datasource.username = ${DB_USER}
#配置数据库密码
spring.datasource.password = ${DB_PASSWORD}
在 docker-compose.yml 配置我们的数据库参数
version: '3'
services:
  web:
    restart: always
    depends_on:
      - db
    image: springboot-app-image
    build: .
    ports:
      - 8080:8080
    environment:
      - DB_HOST=192.168.0.11
      - DB_PORT=3306
      - DB_USER=root
      - DB_PASSWORD=123456
      - DB_NAME=db
    networks:
      - credit-facility-net
    deploy:
      mode: replicated
      replicas: 3
      restart_policy:
        condition: on-failure
        delay: 5s
        max_attempts: 3
      update_config:
        parallelism: 1
        delay: 10s